

Hi !
Ich hab mir vorgenommen bis zum VDR-Camp, genauer gesagt bis zum Ende des VDR-Camps einen komplett neuen VDR Rechner aufzubauen. Da ja durchaus auch andere auf diese Idee kommen koennten hab ich mir gedacht, ich Dokumentier die verschiedenen Schritte hier an dieser Stelle, in der Hoffnung, dass aus meinem Leiden ein Anderer vielleicht schlauer wird.
Dies ist mein Projektziel:
- Ein VDR mit HD-Faehigkeit.
- Klein, Leise, Schnell.
- Kinder, Frau, und Rentnertauglich.
- Auch als Medienserver/Client nutzbar.
Diese Hardware habe ich ausgewaehlt:
Mainboard: MSI P7NGM Digital
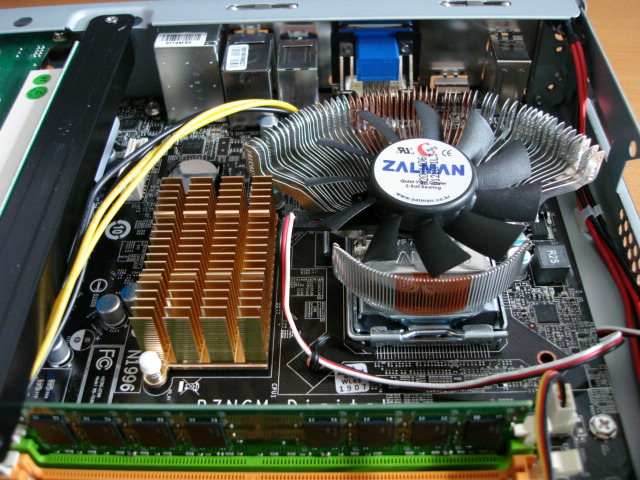
CPU: Celeron Dual Core Processor E1200
Speicher: 2GB Excelleram PC2-6400
HD: 8GB Transcend 133x Compact Flash
HD: 1TB WD RE2 GreenPower Update: Samsung F2 1TB 5400U/min
Cooler: Arctic Cooling Freezer 7LP Update: ZALMAN VGA Cooler
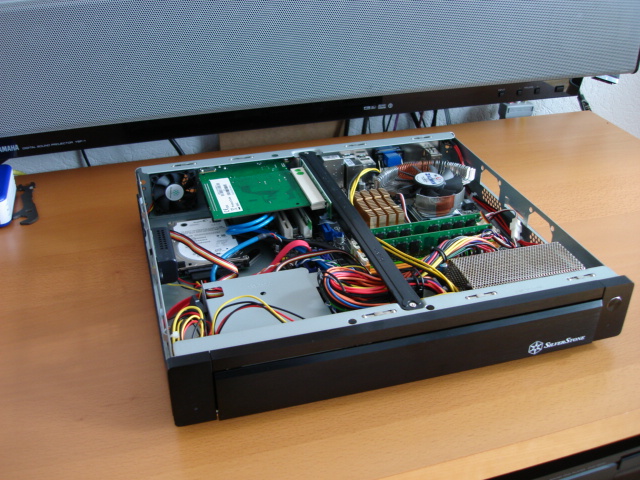
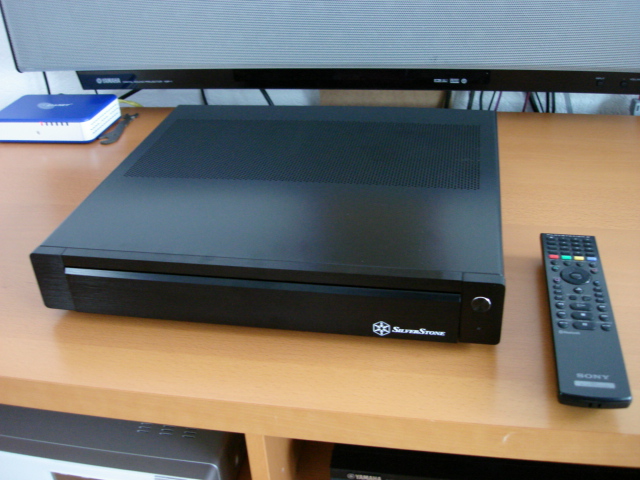
Case: Silverstone La Scala SST-LC19B-R - black
Fernbedienung: Sony PS3 BD Remote Control (bluetooth)
DVB: Technisat SkyStar HD
Ich bin mir bewusst, dass man sicher billigere Hardware haette finden koennen, aber wenn man schon mal was von null auf baut, sollte man sich doch auch was goennen, und da es fuer's Wohnzimmer ist muss es auch gewisse estaetische Grundanforderungen erfuellen.
Ich werde von hier an den Fortschritt chronologisch niederschreiben, es faengt an mit:
Die letzten zwei Wochen vor Tag 1
Ich habe begonnen, die Komponenten die noch fehlen, einzukaufen. Das Mainboard war mit 98 Euronen bei K&M hier direkt vor Ort mit am billigsten, den Speicher hatte ich noch rumliegen, und die CPU hab ich gleich auch dort fuer knapp 42 Euro mitgenommen.
Den CompactFlash-IDE-Adapter und die CompactFlash Karte hab ich bei Amazon bestellt, der Adapter ist nach 3 Tagen da, die Karte laesst auf sich warten.
Es stellt sich heraus, das die Southbridge auf dem Mainboard doch recht stark erwaermt, ich hatte gehofft, dass ich ohne Luefter auskommen koennte ... schade eigentlich.
Die CPU ist dagegen prima, der E1200 unterstuetzt den C1E Haltstate und reduziert sich Idle auf 1,2GHz - der CPU-Kuehler - winzig wie er ist - ist immer noch kuehler als die Southbridge.
Plane gentoo als OS zu nehmen.
Die Speicherkarte kommt einfach nicht, auf zu K&M - dann hab ich halt eine als Backup.
Das Gehaeuse entwickelt sich zum Problem, keiner hat es, oder es ist sauteuer.
Glueck gehabt! Gamersware hat es fuer 169.- Das geht grad noch so - Luefterloses Netzteil ist ja mit drin, kurz nach Miternacht bestellt und mit PayPal bezahlt.
Pech gehabt, abends kam die Mail, das es nicht ab Lager verfuegbar ist - Liefertermin ? keiner. Mist!
Tag 1: ein System muss her !
So, wenn's schon auf die Schnelle kein Gehaeuse gibt, dann muss es halt so auf dem Tisch tun. Als allererstes bereite ich mal die CF Karte vor, wenn da ein System drauf soll, dann muss die Karte erst mal passend vorbereitet werden.
Eine CF-Karte ist im Normalfall voellig ungeeignet partitioniert fuer die Installation eines Systems. Die Block-Groesse des Flash ist meist 4kB oder ein vielfaches davon. Da aber die ersten 1024 Bytes fuer die Partitions-Tabelle benutzt werden ist ein missalignment vorprogrammiert.
Eine Moeglichkeit dies zu umschiffen, ist es die Partitionstabelle zu aendern.
Im Prinzip ist das einfach: Man schreibt sich die Anzahl der Bloecke im Originalzustand nieder, und modifiziert dann im Experten-Menue von fdisk (mit x) die Werte fuer heads, sectors und cylinders. Gute Werte fuer Heads und Sectors sind 128 heads und 32 sectors, (somit sind 2MB in einem Cylinder). Dann Teilt man die Anzahl der vorher aufgeschriebenen Bloecke durch 2048 und bekommt den neuen wert fuer Cylinders. Wenn man jetzt eine neue Partition auf der Platte anlegt ist diese auf jeden Fall alligned.
So sieht meine Tabelle aus:
Disk /dev/sdb: 8019 MB, 8019099648 bytes
128 heads, 32 sectors/track, 3823 cylinders
Units = cylinders of 4096 * 512 = 2097152 bytes
Disk identifier: 0x001c2022


   Device Boot      Start         End      Blocks   Id  System
/dev/sdb1               1          31       63472   83  Linux
/dev/sdb2              32        3823     7766016   83  Linux
Gentoo soll es werden, damit jedoch auch n Celeron mit nur 512kB Cache so richtig zum Rennen kommt muss da ein bisschen was optimiert werden. Aber erst mal steck ich ne alte Platte an das System und boote n Ubuntu-Live um das Gentoo zu installieren. Im Ubuntu live formatier ich die Platte und lade ein i686 stage3 tar - File runter und einen aktuellen Portage-snapshot. Die Platte mounte ich nach /mnt (als root). Erst wenn fast alles fertig ist werd' ich die CF-Karte benutzen, ist ja zu schade die jetzt schon zu verheizen.
Gentoo installieren:
sudo -i
mount /dev/sda1 /mnt
cd /mnt
tar xvjpf /home/ubuntu/Desktop/stage3-i686-2008.0.tar.bz2
tar xvjpf /home/ubuntu/Desktop/portage-20090129.tar.bz2 -C usr/
Mal schnell auf die CPUs schauen, was die so koennen:
root@ubuntu:/mnt# cat /proc/cpuinfo
processor	: 0
vendor_id	: GenuineIntel
cpu family	: 6
model		: 15
model name	: Intel(R) Celeron(R) CPU        E1200  @ 1.60GHz
stepping	: 13
cpu MHz		: 1203.000
cache size	: 512 KB
physical id	: 0
siblings	: 2
core id		: 0
cpu cores	: 2
apicid		: 0
initial apicid	: 0
fdiv_bug	: no
hlt_bug		: no
f00f_bug	: no
coma_bug	: no
fpu		: yes
fpu_exception	: yes
cpuid level	: 10
wp		: yes
flags		: fpu vme de pse tsc msr pae mce cx8 apic sep mtrr pge mca cmov pat pse36 clflush dts acpi mmx fxsr sse sse2 ss ht tm pbe lm constant_tsc arch_perfmon pebs bts pni monitor ds_cpl est tm2 ssse3 cx16 xtpr lahf_lm
bogomips	: 3199.82
clflush size	: 64
power management:


processor	: 1
vendor_id	: GenuineIntel
cpu family	: 6
model		: 15
model name	: Intel(R) Celeron(R) CPU        E1200  @ 1.60GHz
stepping	: 13
cpu MHz		: 1203.000
cache size	: 512 KB
physical id	: 0
siblings	: 2
core id		: 1
cpu cores	: 2
apicid		: 1
initial apicid	: 1
fdiv_bug	: no
hlt_bug		: no
f00f_bug	: no
coma_bug	: no
fpu		: yes
fpu_exception	: yes
cpuid level	: 10
wp		: yes
flags		: fpu vme de pse tsc msr pae mce cx8 apic sep mtrr pge mca cmov pat pse36 clflush dts acpi mmx fxsr sse sse2 ss ht tm pbe lm constant_tsc arch_perfmon pebs bts pni monitor ds_cpl est tm2 ssse3 cx16 xtpr lahf_lm
bogomips	: 3199.93
clflush size	: 64
power management:
CPU Family ist 6, Modell ist 15, das ist ein core2, bei Flags steht pni, also auch mit sse3.
Dann sollten wir uns schnellstens einen gcc4.3 zulegen um das auch effektiv nutzen zu koennen.
Weiter, wir wechseln per chroot ins gentoo:
cp /etc/resolv.conf etc
mount -t proc proc proc
mount -t sysfs sys sys
mount -o bind /dev dev
chroot . /bin/bash
Das hier ist wichtig, wir brauchen neue settings fuer unsere chroot-shell:
ubuntu / # env-update
>>> Regenerating /etc/ld.so.cache...
ubuntu / # source /etc/profile
ubuntu / # cd
ubuntu ~ #
Dann machen wir ein update auf portage (das ist fast nie falsch)
Die make.conf sollte so aussehen:
# These settings were set by the catalyst build script that automatically
# built this stage.
# Please consult /etc/make.conf.example for a more detailed example.
CFLAGS="-O2 -march=i686 -pipe"
CXXFLAGS="-O2 -march=i686 -pipe"
# WARNING: Changing your CHOST is not something that should be done lightly.
# Please consult http://www.gentoo.org/doc/en/change-chost.xml before changing.
CHOST="i686-pc-linux-gnu"


MAKEOPTS="-j2"
Und dann kann man auch schon gcc emergen:
mkdir /etc/portage/package.keywords
echo "=sys-devel/gcc-4.3.2 ~x86" >> /etc/portage/package.keywords/gcc-4.3
emerge \>gcc-4.3
Und Aktivieren:
Jetzt kommt die vorerst passende make.conf fuer unser celeron System zum Zug:
# These settings were set by the catalyst build script that automatically
# built this stage.
# Please consult /etc/make.conf.example for a more detailed example.
CFLAGS="-O2 -march=core2 -pipe -fomit-frame-pointer -fexpensive-optimizations -ffast-math"
CXXFLAGS="-O2 -march=core2 -pipe -fomit-frame-pointer -fexpensive-optimizations -ffast-math"


LDFLAGS="-Wl,-z,relro"


USE="-xcb X xv xvmc nls sdl alsa oss mad a52 jpeg png gif mmx sse sse2 sse3 glibc-omitfp lirc -iconv -kde -gnome -cups opengl"
VIDEO_CARDS="nv"
INPUT_DEVICES="keyboard mouse"


LIRC_DEVICES=""


# WARNING: Changing your CHOST is not something that should be done lightly.
# Please consult http://www.gentoo.org/doc/en/change-chost.xml before changing.
CHOST="i686-pc-linux-gnu"


MAKEOPTS="-j2"
GCC 4.3 kennt die Core2 Architektur, die meisten Optionen in den CFLAGS und LDFLAGS dienen dazu kleineren Code zu erzeugen, denn wir wollen ja mit dem kleinen Cache des Celeron gute Leistungen sehen.
Mal schauen ob wir schon loslegen koennen:
Das hat bei mir nicht so geklappt, da waren doch einige bocker drinn.
Bei mir sah das dann so aus:
[ebuild     U ] sys-fs/e2fsprogs-1.41.3 [1.40.8] USE="nls (-static%)" 4,263 kB
[blocks b     ] <sys-fs/e2fsprogs-1.41 ("<sys-fs/e2fsprogs-1.41" is blocking sys-libs/e2fsprogs-libs-1.41.3-r1)
[uninstall    ] sys-libs/com_err-1.40.8  USE="nls"
[blocks b     ] sys-libs/com_err ("sys-libs/com_err" is blocking sys-libs/e2fsprogs-libs-1.41.3-r1)
[uninstall    ] sys-libs/ss-1.40.8  USE="nls"
[blocks b     ] sys-libs/ss ("sys-libs/ss" is blocking sys-libs/e2fsprogs-libs-1.41.3-r1)
Die 'blocker' deintallieren wir einfach fuer jetzt - wir koennen sie nachher mit all den Tools und Libs die gebraucht werden neu installieren.
Wenn alles dann ok aussieht koennen wir zum Rundumschlag ansetzen:
Das baut gentoo komplett neu, und damit wirklich alles nur aus neuem Code besteht, muss das 3 Mal hintereinander gemacht werden, das dauert.
Und dann war Tag 1 auch schon zu Ende.
Tag 2: der Kernel
Ich hab heut viel ueber das glibc-omitfp Useflag nachgedacht, es waere ja schoen wenn das noch ein paar Prozent Leistung bringen wuerde ... und so wie es grad aussieht tut es das auch. Das System erscheint ein Tick flotter zu sein, und der CPU-Fan legt erst viel spaeter los als vorher, dann aber dafuer richtig. Fuer die, die sich wundern, was das fuer ein komisches Useflag ist: glibc-omitfp erlaubt es explizit beim Bauen der glibc dem compiler das -fomit-frame-pointer Flag mitzugeben, was im Allgemeinen zu kleineren Executables fuehrt. (mehr dazu in den gcc Info Seiten) Da der der Celeron Prozessor einen Recht kleinen Cache hat, freut er sich maechtig wenn er da weniger reinzuladen hat.
Kernel Bauen und Linux installieren. Als erstes holen wir uns einen Kernel und entpacken ihn.
cd
wget http://www.kernel.org/pub/linux/kernel/v2.6/linux-2.6.28.2.tar.bz2
cd /usr/src
tar xvjf /root/linux-2.6.28.2.tar.bz2
ln -sf linux-2.6.28.2 linux
cd linux
Danach muss er nur noch konfiguriert und kompiliert werden. Ich geh' da nur kurz drueber, wenn ich mit meiner Kernel-Config zufrieden bin haeng ich sie hier an.
make menuconfig
make -j2 bzImage
make -j2 modules
make -j2 modules_install
cp arch/i386/boot/bzImage /boot/vmlinuz
emerge lilo dhcpcd
nano /etc/lilo.conf
Die lilo.conf sieht in meinem Fall so aus:
# $Header: /var/cvsroot/gentoo-x86/sys-boot/lilo/files/lilo.conf,v 1.2 2004/07/18 04:42:04 dragonheart Exp $
# Author: Ultanium


#
# Start LILO global section
#


# Faster, but won't work on all systems:
#compact
# Should work for most systems, and do not have the sector limit:
lba32
# If lba32 do not work, use linear:
#linear


# MBR to install LILO to:
boot = /dev/sda
map = /boot/.map


# If you are having problems booting from a hardware raid-array
# or have a unusual setup, try this:
#disk=/dev/ataraid/disc0/disc bios=0x80  # see this as the first BIOS disk
#disk=/dev/sda bios=0x81                 # see this as the second BIOS disk
#disk=/dev/hda bios=0x82                 # see this as the third BIOS disk


# Here you can select the secondary loader to install.  A few
# examples is:
#
#    boot-text.b
#    boot-menu.b
#    boot-bmp.b
#
install = /boot/boot-menu.b   # Note that for lilo-22.5.5 or later you
                              # do not need boot-{text,menu,bmp}.b in
                              # /boot, as they are linked into the lilo
                              # binary.


menu-scheme=Wb
prompt
# If you always want to see the prompt with a 15 second timeout:
#timeout=150
delay = 50
# Normal VGA console
vga = normal
# VESA console with size 1024x768x16:
#vga = 791


#
# End LILO global section
#


#
# Linux bootable partition config begins
#
image = /boot/vmlinuz
	root = /dev/sda1
	#root = /devices/discs/disc0/part3
	label = Gentoo
	read-only # read-only for checking
#
# Linux bootable partition config ends
#Und dann noch die /etc/fstab
# /etc/fstab: static file system information.
#
# noatime turns off atimes for increased performance (atimes normally aren't
# needed; notail increases performance of ReiserFS (at the expense of storage
# efficiency).  It's safe to drop the noatime options if you want and to
# switch between notail / tail freely.
#
# The root filesystem should have a pass number of either 0 or 1.
# All other filesystems should have a pass number of 0 or greater than 1.
#
# See the manpage fstab(5) for more information.
#


# <fs>			<mountpoint>	<type>		<opts>		<dump/pass>


# NOTE: If your BOOT partition is ReiserFS, add the notail option to opts.
#/dev/BOOT		/boot		ext2		noauto,noatime	1 2
/dev/sda1		/		ext3		noatime		0 1
#/dev/SWAP		none		swap		sw		0 0
#/dev/cdrom		/mnt/cdrom	auto		noauto,ro	0 0
#/dev/fd0		/mnt/floppy	auto		noauto		0 0


# glibc 2.2 and above expects tmpfs to be mounted at /dev/shm for
# POSIX shared memory (shm_open, shm_unlink).
# (tmpfs is a dynamically expandable/shrinkable ramdisk, and will
#  use almost no memory if not populated with files)
shm			/dev/shm	tmpfs		nodev,nosuid,noexec	0 0
Am Schluss noch n Passwort fuer den root-User und dann lilo Aktivieren.
Ende von Tag 2.
Tag 3: die Tools, Utilities und Treiber
So langsam faengt das System an Spass zu machen, es wird Zeit, dass es mal was zu tun bekommt. Als aller erstes muessen jetzt mal ein paar Tools drauf, auch der Nvidia X11 Treiber soll jetzt schon mal installiert werden.
X11 installieren: Um den neuesten beta Treiber zu bekommen demaskieren wir ihn und installieren gleich die wichtigsten Utils mit.
echo "x11-drivers/nvidia-drivers ~x86" >> /etc/portage/package.keywords/nvidia-drivers
emerge  nvidia-drivers
eselect opengl set nvidia
cp  /etc/X11/xorg.conf.example /etc/X11/xorg.conf
nano /etc/X11/xorg.conf
Das emergen des Treibers und der dazugehoerigen Komponenten dauert ein wenig, danach editieren wir die xorg.conf:
# $XdotOrg$
#
# Copyright (c) 1994-1998 by The XFree86 Project, Inc.
#
# Permission is hereby granted, free of charge, to any person obtaining a
# copy of this software and associated documentation files (the "Software"),
# to deal in the Software without restriction, including without limitation
# the rights to use, copy, modify, merge, publish, distribute, sublicense,
# and/or sell copies of the Software, and to permit persons to whom the
# Software is furnished to do so, subject to the following conditions:
#
# The above copyright notice and this permission notice shall be included in
# all copies or substantial portions of the Software.
#
# THE SOFTWARE IS PROVIDED "AS IS", WITHOUT WARRANTY OF ANY KIND, EXPRESS OR
# IMPLIED, INCLUDING BUT NOT LIMITED TO THE WARRANTIES OF MERCHANTABILITY,
# FITNESS FOR A PARTICULAR PURPOSE AND NONINFRINGEMENT.  IN NO EVENT SHALL
# THE XFREE86 PROJECT BE LIABLE FOR ANY CLAIM, DAMAGES OR OTHER LIABILITY,
# WHETHER IN AN ACTION OF CONTRACT, TORT OR OTHERWISE, ARISING FROM, OUT OF
# OR IN CONNECTION WITH THE SOFTWARE OR THE USE OR OTHER DEALINGS IN THE
# SOFTWARE.
#
# Except as contained in this notice, the name of the XFree86 Project shall
# not be used in advertising or otherwise to promote the sale, use or other
# dealings in this Software without prior written authorization from the
# XFree86 Project.
#
# $XConsortium: XF86Conf.cpp /main/22 1996/10/23 11:43:51 kaleb $


# **********************************************************************
# This is a sample configuration file only, intended to illustrate
# what a config file might look like.  Refer to the XF86Config(4/5)
# man page for details about the format of this file. This man page
# is installed as MANPAGE
# **********************************************************************


# The ordering of sections is not important in version 4.0 and later.


Section "Files"
    RgbPath	"/usr/share/X11/rgb"
    FontPath	"/usr/share/fonts/local"
    FontPath	"/usr/share/fonts/misc"
    FontPath	"/usr/share/fonts/Type1"
    FontPath	"/usr/share/fonts/TTF"
    FontPath	"/usr/share/fonts/75dpi"
    FontPath	"/usr/share/fonts/100dpi"
EndSection


Section "Module"
    Load	"dbe"
    Load        "glx"
    SubSection	"extmod"
	Option	"omit xfree86-dga"
    EndSubSection
    Load	"type1"
    Load	"freetype"
EndSection


Section "ServerFlags"
    Option	"blank time"	"10"	# 10 minutes
    Option	"standby time"	"20"
    Option	"suspend time"	"30"
    Option	"off time"	"60"
EndSection


Section "InputDevice"
    Identifier	"Keyboard1"
    Driver	"keyboard"
    Option	"AutoRepeat"	"500 5"
    Option	"XkbLayout"	"de"
    Option	"XkbVariant"	"nodeadkeys"
EndSection


Section "InputDevice"
    Identifier	"Mouse1"
    Driver	"mouse"
    Option	"Protocol"	"Auto"
    Option	"Device"	"/dev/input/mice"
EndSection


Section "Monitor"
    Identifier	"Generic Monitor"
    Option	"dpms"
EndSection


Section "Device"
    Identifier	"Generic VGA"
    Driver	"nvidia"
EndSection


Section "Screen"
    Identifier	"Screen 1"
    Device	"Generic VGA"
    Monitor	"Generic Monitor"
    DefaultDepth 24
    SubSection "Display"
        Depth		24
        Modes		"1280x720"
        ViewPort	0 0
    EndSubsection
    SubSection "Display"
	Depth		4
        Modes		"640x480"
    EndSubSection
    SubSection "Display"
	Depth		1
        Modes		"640x480"
    EndSubSection
EndSection


Section "ServerLayout"
    Identifier	"Main Layout"
    Screen	"Screen 1"
    InputDevice	"Mouse1" "CorePointer"
    InputDevice "Keyboard1" "CoreKeyboard"
EndSection
Als naechstes installiere ich die Bluetooth Utilities, um spaeter die Bluetooth Fernbedienung einbinden zu koennen.
Nach einigen Ueberlegungen erwaege ich, einen eigenen Treiber fuer die Sony BD Remote zu schreiben, zumindest ein kleines LIRC daemon Tool, das die Fernbedienung direkt in LIRC einbindet. Das Konzept, fuer sich selten aendernde Konfigurationen eigene Tools zu entwickeln hat sich zumindest bei den zen* Distries als ganz praktisch erwiesen. Ganz abgesehen davon freue ich mich auf eine Fernbedienung, mit der man nicht mehr Zielen muss.
Ende von Tag 3.
Tag 4: Kleinigkeiten
Heute hab ich mich mal um so ein paar Sachen gekuemmert, von denen ich hoffe, dass sie klein bleiben. Das Erste war der Stomverbrauch: Der Kleine Rechner braucht - mit der SkyStar HD drauf, dem CF, der noch nix tut, und der Build-Platte im Idle-Zustand etwa 55Watt. Beim Kernel-Kompilieren geht der Verbrauch bis auf 80Watt hoch. Ich gehe mal davon aus, dass da noch mal so etwa 5 bis 10 Watt dazukommen, wenn ich die DVB Karte richtig in Betrieb nehme, aber das sehen wir dann, wenn es so weit ist. Alternativ ueberlege ich statt dem Celeron E1200 einen Celeron 430 mal zu testen, das koennte dann aber etwas knapp werden fuer unbeschleunigte Video-Wiedergabe.
Das zweite was klein bleiben sollte ist der Aufwand fuer den Lirc-Treiber fuer die BD Remote. Das sieht soweit auch ganz gut aus, allerdings ist die Doku der Bluetooth-Linux Treiber nicht soooo der Hit. Um spaeter mal xine und mplayer mit vdpau bauen zu koennen hab ich sie schon mal mit allen Voraussetzungen per emerge installiert - das sollte die Basis fuer spaetere Experimente geschaffen haben.
Xine-lib, Xine-ui, und Mplayer installieren:
Neuigkeiten gibt es auch vom Gehaeuse: Nachdem drei Tage lang bei Gamersware niemand ans Telefon gegangen ist, und die bei PayPal hinterlegte Nummer nicht angeschlossen war, hab ich jetzt zumindest die telefonische Zusage erhalten, das es am 04.02.2009 bei denen eintrifft, und dann umgehend an mich rausgeht. Die Speicherkarte ist weiterhin verschollen.
Ende von Tag 4.